
Wandered across this post and found it very interesting.
Subversive Stitchers: Women Armed with Needles: Good Advice from a Real Professional Artist: Susan Lenz
Got to love the blog title. But seriously, the points Susan Lenz brings up are oh so valid. Work worth doing is worth doing well, and I need to remember that, and put the time in that my art needs and requires of me.
Tuesday, November 30, 2010
Subversive Stitchers: Women Armed with Needles: Good Advice from a Real Professional Artist: Susan Lenz
Saturday, November 20, 2010
Polyester references

Hi all – discussion of polyester comes up on the DyersList from time to time, so I thought I’d gather together the recent entries here. Plus it’s a chance to include some photos of my fabrics! Hover over the photo for a description.
In the books I have in my stash, there are three references to dyeing polyester:
- Brackmann, Holly ‘The Surface Designer’s Handbook’ – chapter 7
- Dahl, Carolyn ‘Transforming Fabric’ – chapter 8
- Proctor, Richard M, and Jennifer Lew ‘Surface Design for Fabric’ – page 42 - 43


Caryl Hancock also posted to the DyersList and kindly allowed me quote her:
I have two more sources for information on disperse dyes: the first is a book by Linda Kemshall, "Color Moves, Transfer Paints on Fabric" published by That Patchwork Place (Martingale?), C. 2001. Explains a lot of the ways to "play" with these dyes. (http://www.amazon.com/Color-Moves-Transfer-Paints-Fabric/dp/1564773418/ref=sr_1_2?s=books&ie=UTF8&qid=1290198560&sr=1-2) Under $10.Thanks, Caryl!

The second is a booklet by Jan Beaney and Jean Littlejohn, "Transfer to Transform." This is one of their earlier booklets (about 20 pages, I think) and is available from Quilting Arts or Amazon $16-21. There is nothing in the notes from the 2 classes I have had with Lisa [Grey] about other reference books; she probably knows the most of just about anyone about these dyes, and is a great teacher.
I also saw that there is a disperse dye class being offered at the SDA conference in Minneapolis next June.I have also purchased some of the colors from ALJO (http://www.aljodye.com/main.html) that are different from what Pro-Chem offers - no affiliation.

 Donna Joslyn also added more information:
I use disperse dyes in printers. I buy them from Sawgrass. Sawgrass Inks also has a textile ink that prints from epson printers - the 4000 series prints 17" wide. http://www.sawgrassink.com/ they sell both desk size and large format printers, equipment and supplies. Conde Systems is another good supplier.
Jaquard also has dyes filtered very fine for printers. since they are acid and reactive dyes they need to be steamed - whereas textile pigments do not. disperse dyes need a heat set but not necessarily steam.there is a lot of information out on disperse dyes in printing presses. I mentioned sawgrassink before in another reply, and conde systems. They are also known as sublimation inks to printers. If you google sublimation inks you will find quite a bit.
Thank you too, Donna!

And Nancy Evans came up with another reference -
Below is a cut and paste from Pro Chemical’s Product Instructions page.
Imagery on Fabric by Jean Ray Laury also has a section on disperse dyes as well as transfer papers (which is just paper that is coated with disperse dye). A couple of times, I've lucked into acquiring some transfer papers, and they are fun to play with - got them at a thrift shop and a fabric store that holds onto everything it ever carried - nothing is clearanced! My good fortune to find them. I find the transfer papers are much more intense than the papers I paint with the disperse dye. Might be a function of how I've mixed? I do try to follow directions tho.... so maybe the papers are just brighter. ---nanThanks to you too, Nan!
I have learned a lot from Lisa Grey through a few emails and a phone call. Here’s a link to her class description: http://www.lisagrey.com/Lisa_Grey/Printing_DD.html - be sure to click on the “student work” link at the bottom.PRO Disperse Dyes Designed to permanently dye synthetic fibers -- in particular polyester, acetate rayon, nylon, and acrylic. Solid shade dyeing is done at a boil. A swelling agent, PRO Dye Carrier NSC, is necessary for the dye to penetrate polyester fiber.** Acrylic fibers do not dye dark; expect to achieve a pastel depth of shade only. Two ounces (58 gm) of dye powder will dye 25 lbs (11 kilograms) of polyester to a medium shade in a solid shade dye bath. Available in 13 intermixable colors. Note: many polyester and polyester-cotton fabrics have a permanent press finish. This must be removed before successful dyeing is achieved.
Transperse Transfer Printing Dyes - Your best choice for transfer printing on polyester and poly blends. Available in 9 intermixable colors.

And don't miss the work of Barbara Barrick McKie at http://www.mckieart.com/!
>
**I have never done any of my polyester this way. It is all direct application of dyes, either regular or thickened, allowed to dry and heat pressed. The thickened dye is more frugal – all the color is on the ‘right’ side (important with NuSuede), with the back remaining white. I also don’t do heat transfers, because I do 3 – 4 yard pieces and want fairly consistent results. Have yet to do any screen printing – I’ve never gotten into that.
Friday, November 19, 2010
Reviews and Previews
Hard to believe 6 weeks have passed since I last posted. If troubles come in threes, we’ve had it for a while. After the bad brake incident in September, we came home to a hole in the roof, with water running down from the third floor to the entrance hall. Yuck. Got it fixed (there went any profits,) and a couple weeks later the heater started making loud noises and shooting flames. 
We did a total of six shows this fall; still haven’t crunched all the numbers, but it’s time for some other source of income. My current plan is to do the spring shows in Hampton, VA, Somerset, NJ and Lancaster, PA, and then probably no shows except Oaks, since it’s 20 miles away, until (drumroll) Houston, next fall. I spent almost as 
Thanksgiving is a week away and as always there’s a lot to be thankful for. I’m thankful for all the opportunities that have come my way this year, and all the wonderful people I’ve met along the way. I’m thankful for the optimism necessary to keep trying for 
Snow Dyeing!
Well, there has been a fair bit of buzz on the DyersList about snow dyeing, and after seeing the great tutorial on Bunk's Blog I had to try it! So here are the pictures of the process and finished products. If you look closely you see a timer in the rear corner showing the elapsed time.
 Did four fat quarters presoaked in soda. The darkest didn't turn out, the other three are undyed white sateen, and print cloth and muslin in a pale orange/flesh tone. The muslin is the darker of the two.
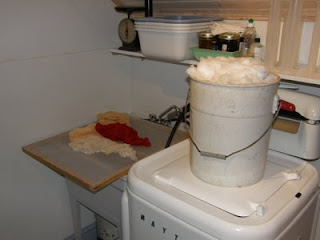
 Carefully piled the snow over the four fat quarters. We had rain and ice after the snow, so it's anything but fluffy.
 After applyling the dye: tangerine (MX-GR) and strongest red (MX-GBA). I used some of it straight (5% concentrate), watered some of it down, and mixed some together by eye before pouring it on. I also poured my rinse water onto the snow. You can see here that the board is made of a wooden frame with large pieces of needlework plastic canvas stapled to it. Thanks, hubby.
 1 1/2 hours in and melting is happening.
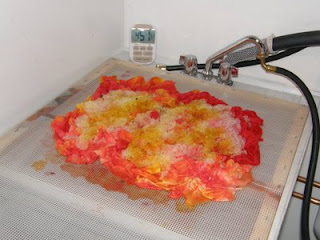
 Later, a close-up showing the dirt particles appearing. Yuck.
 OK, after 3 hours 20 minutes I was getting impatient, so I sprinkled several tablespoons of salt over the snow. Time above is 4 hrs, 51 minutes.
 Nearing the end; I'm pretty sure I let it go about 6 - 6 1/2 hours.
 This is the muslin.
 The is the sateen that started out white. If you look at the enlargement, you can see where it picked up the grid pattern from my board.
 This is the print cloth.
All in all, I'm very pleased with the results, I just need to figure out how to do a lot of it! Thanks, Karen, for your inspiration!
 Did four fat quarters presoaked in soda. The darkest didn't turn out, the other three are undyed white sateen, and print cloth and muslin in a pale orange/flesh tone. The muslin is the darker of the two.
  Carefully piled the snow over the four fat quarters. We had rain and ice after the snow, so it's anything but fluffy.
  After applyling the dye: tangerine (MX-GR) and strongest red (MX-GBA). I used some of it straight (5% concentrate), watered some of it down, and mixed some together by eye before pouring it on. I also poured my rinse water onto the snow. You can see here that the board is made of a wooden frame with large pieces of needlework plastic canvas stapled to it. Thanks, hubby.
  1 1/2 hours in and melting is happening.
  Later, a close-up showing the dirt particles appearing. Yuck.
  OK, after 3 hours 20 minutes I was getting impatient, so I sprinkled several tablespoons of salt over the snow. Time above is 4 hrs, 51 minutes.
  Nearing the end; I'm pretty sure I let it go about 6 - 6 1/2 hours.
  This is the muslin.
  The is the sateen that started out white. If you look at the enlargement, you can see where it picked up the grid pattern from my board.
  This is the print cloth.
 All in all, I'm very pleased with the results, I just need to figure out how to do a lot of it! Thanks, Karen, for your inspiration!
7 comments:
- Deb said...
-
Love the snow dyes! It does make me think I'd like to try and especially love the grid marks from the board underneath!!! I live in the south, so this is a limited opportunity for me. I may get the equipment ready and see if we get a rare snow storm for me to try it. For our usual snow storms check out my recent posting in my blog http://debharwell.blogspot.com/
- Thursday, January 29, 2009 2:51:00 PM GMT-05:00

- Karen said...
-
It turned out great, good job, neat seeing the grid pattern on the fabric. That happened to me once with a golf ball (don't ask).
Karen - Thursday, January 29, 2009 4:09:00 PM GMT-05:00
- Anonymous said...
-
this is cool lisa! i am definitely going to try this out (sooner or later). we have plenty of snow but it is unfortunately buried under a good piece of ice. sort of like creme brulee on a large scale.
Rita from Scranton - Friday, January 30, 2009 8:08:00 AM GMT-05:00
- I'm Bobbie said...
-
Love your pieces! Thanks for your comment on my blog. Yes, I've been to the Barn many times, all of Carol Soderlund's classes plus more. Bet we've been there at the same time.
Keep up the great blog! - Tuesday, February 3, 2009 3:05:00 PM GMT-05:00
- Judy said...
-
lovely snow dyeing.......pity I live in GA where we rarely have any snow at all!
- Sunday, February 15, 2009 10:18:00 AM GMT-05:00
- Sue said...
-
Your fabric is very, very pretty. Thanks for blogging about it. I have a question though. Do you think the results are significantly different than doing low immersion dyeing and really good scrunching? Just curious, as I've not done it.
Sue - Sunday, February 15, 2009 10:42:00 AM GMT-05:00
- Lisa in Penna said...
-
Hi Sue - The finished product is rather different from traditional scrunching. Two of the fabrics were already dyed a very pale orange, but the sateen that started out white doesn't have any white areas remaining. They are pale yellow at the lightest. Also, there isn't the usual crystalline patterning from LWI. All the edges are softer. Jane Dunnewold described this as 'snow resist' dyeing, and I think that the gradual combination of dye and fabric does lead to a different result. I'd like to hear what other folks think! - Lisa
- Sunday, February 15, 2009 9:28:00 PM GMT-05:00
Links to this post
- Färben im Schnee
- 1. Schnee vom Gestern Des öfteren bin ich gefragt worden, ob ich schon im Schnee gefärbt hätte. Gereitz hat es mich schon lange. Gestern habe ich es endlich probiert, Schnee gibt es ja momentan genug. In Quilting Arts Nr. ...
- Posted by Helena at Friday, January 15, 2010 4:50:00 AM GMT-05:00
Subscribe to:
Posts (Atom)


